Monday, August 31, 2009

Fabric Selvage Postcard Tutorial


As promised, here is my attempt at a tutorial. There are several other postcard tutorials out there on the net, but I've tweaked them a bit to make what works for me. If you make a selvage postcard using these instructions, please let me know if you had any difficulty following the steps. And, of course, I'd love to see your final results! And if I can get it to work, I plan to make a PDF file available on my blog someday. Updated -- link to the PDF is on my blog's sidebar.

This tutorial is for non-commercial personal use ONLY. Feel free to share with others, but please give the author (me) credit. NO COMMERCIAL USE ALLOWED. Thanks.
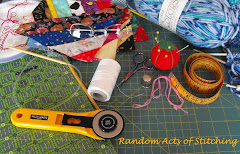


Supplies --
-- one 4 1/2" x 6 1/2" piece of white/cream fabric for the back of the postcard

-- one 4 1/2" x 6 1/2" piece of fusible fleece (fusible on one side only)

-- one 4 1/4" x 6 1/4" piece of fusible web (I used Heat 'n Bond Lite)

-- thread (at first I thought I'd use red, but changed my mind to pink after I had the selvages arranged)

-- permanent fabric marker

-- fabric selvages
__________________________________________

1. Center the fusible web on the wrong side of the white fabric and iron on. When cool, remove the paper backing. Set aside.


_________________________________________

2. On the fusible fleece (fusible side up), arrange the selvages the way you like, making sure to overlap the finished edge of a selvage on top of the unfinished edge of the previous selvage. Once you have decided on a design, with the iron gently fuse the selvages onto the fleece. This will help keep the selvages on while you sew them on the machine.


___________________________________________

3. Sew the selvages onto the fusible fleece, sewing very closely to the finished edge of each selvage strip. In this sample I used a straight stitch, but I've also used a small zigzag stitch at times.


___________________________________________

4. Trim the selvages to about 1/4" all the way around the fusible fleece. Discard the trimmed off pieces of selvage (unless they're long enough to be used in a future project).


___________________________________________

5. If your sewing machine has an alphabet stitch and you choose to embroider a message across the front of the postcard, press the unfinished edge of another selvage piece under (wrong sides together) 1/4" or so.


___________________________________________

6. Sew this selvage strip on, sewing very closely to the pressed edge. Here I've used a straight stitch, but a fancy stitch would look nice, too.


___________________________________________

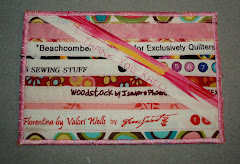
7. Stitch your message on this strip, making sure you don't start or finish too close to the edge (the card will be trimmed a bit later). You could also just stitch the message on one of the selvages already on the card if there is enough white space.


___________________________________________

8. Center the white fabric on the unfusible side of the fleece and fuse the pieces together. Let it cool.


___________________________________________

9. Trim the card to 4" x 6".


___________________________________________

10. Satin stitch all the way around the edges of the card.


___________________________________________

11. Using a permanent fabric marker, write "POSTCARD" on the top of the back side. Write your message and heat set the writing. (I usually add my personal label before I satin stitch around the edges).


___________________________________________

12. Add a FIRST CLASS STAMP (not a postcard stamp) and take it to the post office to be hand-cancelled. Don't let the clerk tell you it needs additional postage! I've sent these (from at least three different post offices) to Oregon, Connecticut, Florida, Idaho, North Carolina, and a number of other states, as well as locally with no problem at all.

___________________________________________
That's it. Have fun!
To see samples of my postcards, just click on the "postcard" label on my blog's right sidebar.


Saturday, August 29, 2009

Nine-Patch Overload

The last set of 16 blocks in the nine-patch swap that I signed up for this summer has arrived. I'm amazed at the variety and can't wait to put them all together into a charity quilt.

You can see the other two sets here and here.

Thank you to Anina of Twiddletails for organizing the swap!

Thursday, August 27, 2009

Just A Little Thank You

I've been the lucky winner of a few giveaways this summer, so I made these selvage postcards as little thank you notes to the bloggers who have been so generous.

The pink one is for the ladies at Quilt Taffy, Corrie and Des, who picked me as the winner of the fabric you see in this post. The only selvage in the postcard is from that piece of fabric.


Megan, the Mad Quilting Librarian, picked me as the winner of a lovely pack of black and white charm squares in her giveaway in July.


And the last, but certainly not least, is for my fellow Pennsylvanian Nancy of Blogging, Near Philadelphia to thank her for the checkbook pattern that she no longer needs.

Thank you to all you generous bloggers!

I have had several people ask me how I make these, so I'm seriously thinking of coming up with a tutorial. That's my goal for the weekend. Stay tuned...

Wednesday, August 26, 2009

Look What I Did!

The Internet is a wonderful thing -- I recently found a great video showing how to neatly fold fat quarters so that no raw edges are exposed. Isn't my pile pretty?


And it started out like this...


I even figured out how to fold a half-yard of fabric (the red and white check) in a similar fashion.

Cool, huh?

You can watch the video below...it's surprisingly easy to do. If you have trouble seeing the video on my blog, go here.


Tuesday, August 25, 2009

It's Been A While


I've been busy making postcards lately (you'll see a few more later this week) and haven't had much time to work on my DJ quilt. Here's the first block I've made in 3 weeks.

It's "I-7, Mac and Muff", an intermediate-level block that I chose to paper piece and then added the itty-bitty triangles using the raw-edge machine-buttonhole stitch method. Those teensy-weensy triangle pieces are even smaller than the ones seen here.

Sunday, August 23, 2009

Mystery Solved

The wonderful quilt shop in Wellsboro, Needles, recently ran an 8-month mystery quilt project. Although I didn't participate, I was invited to see the revealing of some of the quilts a few days ago. You can see the lovely projects in this photo -- sorry about the so-so quality...it was early evening with very bad lighting.

Every quilt is different because each quilter picked her own fabrics for the project. Nice job, ladies.

You can click on the picture to see a closer view.

Friday, August 21, 2009

Almost Forgot


I just realized that I never posted a photo of my DJ sections after this month's gathering of my guild's Laurel Janes. You may remember that I showed the group's various DJ works in progress (one completed) in this post.

So far, I have completed 144 blocks -- there are 72 of them sewn together into sections as shown in today's photo. I plan to sew the top 6 rows together and then the bottom 6 rows together and then I'll put it all together with the middle 13th row. I try to make as many sections as I can that are 3x3 or 3x4 blocks instead of long rows which can get a bit wonky. Can't avoid them completely though.
I guess I'm making some progress...

Wednesday, August 19, 2009

Having A Ball

Since late 2000, every baby born into my husband's side or my side of the family has received a quilt from me. That's 11 babies so far, with another one on the way in February. To prevent unnecessary tears, I've made it a habit to include a small handmade gift for any older siblings. A few years ago, the gifts were soft patchwork balls made using the patterns and instructions in Jinny Beyer's "Patchwork Puzzle Balls" book.

Jinny prefers hand-piecing, but I found the balls to be great practice for trying Y-seams on my sewing machine. I was pleased to discover that it wasn't too frustrating. I left just one small seam open in each ball for stuffing and then hand-stitched that seam closed.
The balls are stuffed with leftover pieces of poufy batting that I had collected over the years from miscellaneous projects. The book says to use regular stuffing material, but the batting worked well enough for me. I just tore it up into very small irregular pieces.

I'm told that the balls were a great hit. And the parents are still trying to figure out how I sewed them together....

Monday, August 17, 2009

They Don't Make Things Like They Used To

I just got back from spending a few days visiting my parents and while I was there, I took a picture of my mom's faithful iron that she's had since at least the 1960s. The cloth-covered cord is enough to make a daughter worry, but there is no way that my mother will give this up unless it stops working.

Wouldn't it be nice if today's appliances were as reliable as this?

Saturday, August 15, 2009

You Could Be A Winner, Part Two!


If you don't win one of the fabric bundles mentioned in my previous post, perhaps you could win this lovely quilt (called Very Berry Lemonade) being raffled off by the Northern Tier Children's Home in north-central Pennsylvania. Three of my quilting friends and I made this earlier this summer and tickets are now available at the NTCH thrift store on Charleston Road in Whitneyville, PA. Just another reason to entice you to visit Tioga County in September...

Thursday, August 13, 2009

You Could Be A Winner!


A few of my Mountain Laurel Quilt Guild friends and I spent several hours yesterday making up some jelly rolls, layer cakes, and charm packs to be used as door prizes at a tea that our guild is having in September. The fabrics that we used were from our guild's stash of donated fabrics. This photo shows you the pretty results. Hard to believe that there are about 14 yards of fabric in this picture! And we still have bins and bins of fabric left.

If you are anywhere near Wellsboro, PA on Saturday September 12th from 2-4 PM, you are welcome to join us for the tea. It's at the First Presbyterian Church on Main Street next to the Green Free Library and Gmeiner Art and Cultural Center. There will be quilts on display, refreshments, and of course, door prizes. Please bring your quilting friends and if your guild would like to make a group trip, send me an email and perhaps we could talk you into bringing some of your quilts for a "show and tell". Admission is free. Who knows, you might go home with one of these pretty bundles...

Wednesday, August 12, 2009

Another One Off The List

My friend Moddy (who loves pink with a splash of purple once in a while) is having a birthday next week so I made this selvage postcard as a surprise for her. A good number of these selvages came from her projects. She doesn't read my blog, so I doubt the surprise will be spoiled by showing this photo a bit early.

Moddy is the one who loves to make quilt tops and then lets me play with my HQ16 on them. You can see some of her quilts by clicking on the "Moddy's quilts" label on the right sidebar of my blog.

Monday, August 10, 2009

Better Late Than Never

I'm a bit late in sending a thank you to Melissa of Made by Melissa for the cute chicken creations that I won from her a couple of months (!) ago in the giveaway day that several hundred bloggers participated in.

Melissa made these cute items based on some of her own doodling. Aren't they adorable?

As a thank you, I sent Melissa a fabric postcard using a pretty tulip fabric and the selvage from the same fabric. When I was getting ready to embroider the personalized message, I remembered that my machine had some fancy stitches...after a quick search, I found a tulip stitch that worked perfectly with the card, so I used that to secure the selvage to the front of the postcard.

I have several more postcards that I need to make this week....better get working on them...

Saturday, August 8, 2009

My Side of the Rainbow

About a week ago, Karen Griska posted a photo of her neighborhood and asked her readers to send her photos of theirs. I thought that was a great idea.

So here is what I see out by back door. It's actually taken on the deck where I often sew when the weather is lovely (hey-- we've had 5 days in a row this week with NO RAIN -- I think that's a record this summer). Our property line is just behind the row of small evergreens in the background. The fence allows us to keep our sheltie from wandering too far away. You can't see them, but we have woods on both sides to the left and right and a bit in front of the house. Altogether, we have about 4.5 wonderful acres.

The fabric rainbow you see on the grass is the result of a wonderful day of hand-dyeing with some of my quilting friends...I'm afraid we're getting obsessed with this...see this post about our project last month...

If you haven't seen Karen's Selvage Blog, you must spend a few minutes checking out all the inspiring projects on there.

So, what's in your neighborhood?

Thursday, August 6, 2009

Great Day

Yesterday, my friend Susan and I made a trip down to Verna's Fabrics in Mifflinburg, PA and to the farmers' market in Lewisburg. I was so overwhelmed by all the wonderful fresh produce and baked goods at the market that I forgot to take pictures. My bags were filled with peaches, nectarines, plums, cherries, cantaloupe, tomatoes, mushrooms, green pepppers, brussels sprouts, green leaf lettuce, and apple cinnamon sticky buns. Oh yes, and some garlic and onion smoked sausage.

I didn't go overboard at Verna's. I only bought what I needed...a red and a blue to go with some other primary-color fabrics for a kid's quilt and a white (you can't see the dots on it) from the $3/yard table for a backing. And Verna threw in an anniversary cup.

You can read about a similar trip here.


Oh yes, and by the way....college boy is home!