I made these fabric postcards for three friends early in 2020. I browsed Pinterest for some ideas and made my own patterns. These turned out so fun that I wanted to keep them for myself!
(click on photos to enlarge)


I made these fabric postcards for three friends early in 2020. I browsed Pinterest for some ideas and made my own patterns. These turned out so fun that I wanted to keep them for myself!
(click on photos to enlarge)


 This is a postcard I recently sent to Karen Griska of Selvage Blog to thank her for picking me as a winner in one of her recent giveaways. I'm hoping it has arrived in her mailbox already.
 Many of you may know that Kelly of I Have a Notion had a month of giveaways recently (and perhaps some of you entered and won). I entered a few of them myself and was thrilled when Kelly contacted me and told me that I had won one of the prizes -- a DVD on quilting feathers from Patsy Thompson! Whoohoo --- now I can be Patsy Thompson when I grow up! (well, maybe not quite).

 This postcard is for Sara, who picked me as the winner of her giveaway of a Loralei fabric panel. Some of the selvages are from the fabric she sent. Check out her blog sometime -- I especially like the mini snowflake quilt that she made for a swap partner.
 Thanks again, Sara!
 Another one of my quilting BFF's is having a birthday today (Happy Birthday, Madalene!), so of course, I had to make a fabric postcard for her. The purples are really much purplier in person (and much prettier). You can see the postcard I made for her last year at the bottom of this post.

 I did make use of the selvages, however, as you can see by the thank you postcard I made for Bree...
 I loved participating in a quilty PIF project -- if you want to see what I made for someone else, check my blog post here. According to the PIF "rules", I still need to make something for two other people, so if you're interested, keep your eyes open for when I have signups...
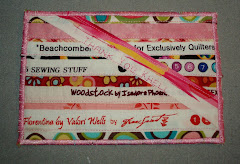
 As a thank you to Heather, I made this selvage postcard for her using the selvages from the fabric she sent. (I'm getting quite predictable with the thank you cards I send nowadays).
 If you'd like to make some of these yourself, a PDF version of my postcard tutorial is available on my blog's sidebar.
 I made this postcard for Janice from the UK using selvages from the fabric I won in her giveaway.
 Today is my friend Susan's birthday (go to her blog and wish her well), so I couldn't let the day go by without making a selvage postcard for my blogging partner-in-crime. HAPPY BIRTHDAY SUSAN!
 And I recently found out that another quilting friend had a birthday a couple of weeks ago (she's very good at keeping secrets) , so she got a card as well (even though it was a tad late).

 The second selvage postcard is to thank Megan for the adorable 30s fat quarters I won in the giveaway on her Will Work for Fabric blog. The selvages in this postcard came from the FQs she sent me.
 Here's a shot of the box of goodies that arrived from her. In addition to the FQs, she sent a nice pattern and an adorable golf tee pin cushion. How cute is that?
 The last postcard is for Kheli of Remember Your Karma who sent me a box containing various pieces of lovely fabric, some embroidery floss, and a few other little goodies. Some of the selvages in the postcard came from the fabric she sent.


 1. Center the fusible web on the wrong side of the white fabric and iron on. When cool, remove the paper backing. Set aside.
 2. On the fusible fleece (fusible side up), arrange the selvages the way you like, making sure to overlap the finished edge of a selvage on top of the unfinished edge of the previous selvage. Once you have decided on a design, with the iron gently fuse the selvages onto the fleece. This will help keep the selvages on while you sew them on the machine.
 3. Sew the selvages onto the fusible fleece, sewing very closely to the finished edge of each selvage strip. In this sample I used a straight stitch, but I've also used a small zigzag stitch at times.
 4. Trim the selvages to about 1/4" all the way around the fusible fleece. Discard the trimmed off pieces of selvage (unless they're long enough to be used in a future project).
 5. If your sewing machine has an alphabet stitch and you choose to embroider a message across the front of the postcard, press the unfinished edge of another selvage piece under (wrong sides together) 1/4" or so.
 6. Sew this selvage strip on, sewing very closely to the pressed edge. Here I've used a straight stitch, but a fancy stitch would look nice, too.
 7. Stitch your message on this strip, making sure you don't start or finish too close to the edge (the card will be trimmed a bit later). You could also just stitch the message on one of the selvages already on the card if there is enough white space.
 8. Center the white fabric on the unfusible side of the fleece and fuse the pieces together. Let it cool.
 9. Trim the card to 4" x 6".
 10. Satin stitch all the way around the edges of the card.
 11. Using a permanent fabric marker, write "POSTCARD" on the top of the back side. Write your message and heat set the writing. (I usually add my personal label before I satin stitch around the edges).






 Posts
All Comments


 Quilter Blogs & Store Search


