 Now that my Bernina is home, I was able to complete a block using the raw-edge machine buttonhole-stitch method that I like to use for applique whenever I can. All of the dark fabric that you see was cut out as one piece and sewn down as one piece.
I thought I'd show how I make blocks like this.
Hopefully, Blogger will put the photos in the right order...
First, print the block on freezer paper and cut out the shape leaving a bit extra around the edges. Then press the paper onto the fabric.

 Next cut along the lines of the shape using very sharp scissors, being careful at the points where the melons meet the square so that they don't come off. Sorry that the photo is so blurry, but it's hard to take a good closeup shot with your left hand while trying to cut with your right.
Then slowly remove the freezer paper from the fabric. Place the fabric on the background square and sew the buttonhole stitch with the machine. Some people use lightweight fusible web and fuse the fabric shape to the background, but I haven't had any real trouble keeping the pieces where I want them to be. I don't like the feel of the fusible stuff in the completed block and I don't like risking gumming up my needle, so that's why I don't use it.
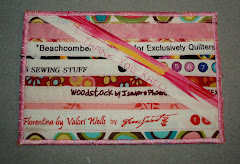
I used this technique for the block I made here, except that the four outside diamonds were sewed on separately. Now that I look at it, if I was very careful, I could probably have done it as all one piece just like today's block. This is another block where the melons were cut as one piece, not four. One more example here.


 Quilter Blogs & Store Search


2 comments:
Great way to complete the block! Just curious, how many more Dear Jane blocks do you have to go? How many are in the total quilt?
Ahhhhh a very pretty block...thank you for the tutorial! You are a talented quilter, as we have witnessed on your blog! Have a wonderful day!
Post a Comment